I haven't talked a lot about dieting, because I don't like to do it. I hate dieting--I hate the idea of altering your nutritional intake so drastically just to lose ten pounds and have them all come back when you start eating normally again. It's dumb.
However, in my attempt to be healthier, and let's be honest here, look smoking hot when I am laying out in my bathing suit in Vegas (more on that later), I have decided to start watching what I eat. *GASP* Shocking, I know. No formal diet, though, no crazy (and expensive) juice cleanses (although Gilt is having a sale right now), just more awareness of what goes in my belly.
The Goal: Low end of normal for my height by Vegas-time (4 weeks).
The Progress: 3 lbs left according to my bathroom scale (which MM says is off by 10 lbs--THANKS FOR NOTHING, HONEY. So maybe 13 lbs.)
This is what I have learned so far from this harrowing experience.
1. Holy shit serving sizes are small. As part of my "awareness", I have started loosely keeping track of calories. One of my biggest weaknesses is portion sizes, and one the easiest ways for me to control this is to limit myself to one serving (unless it's some ridiculous increment) per sitting. This has made me realize how small some serving sizes are--yeah, cereal is only 120 calories...for HALF A CUP. Do you know how small half a cup is?? I guarantee you, I used to eat like three servings of cereal for breakfast.
2. You don't have to eat what your boyfriend eats. When cooking for two, it's so easy to prepare a meal, then just split it down the middle for the both of us. One steak for me, one steak for him. Then I realized, do I really need a 16 oz steak? Two huge spoonfuls of mashed potatoes? No, probably not. He has more height to distribute all that food, and I need to realize our plates SHOULD be uneven. And it's okay to have leftovers. That's why they invented tupperware. This leads to...
3. You don't have to eat WHEN your boyfriend eats. MM likes to have his "wind down" beer at the end of the night. Sometimes this is accompanied by "wind down" snacks as well. I can never resist eating when he's eating. Even when I'm not hungry!! This needs to stop. Especially when he comes home with late night tacos from Big Star. Mmmmm....but honestly, who's hungry when they're awoken after an hour of sleep? Not me. Did I still eat two tacos? Yes. *for shame*
4. If it's not in the house, you won't eat it. Up until maybe a month ago, I wasn't buying chips or crackers when I went grocery shopping. Did I miss it? Maybe a little when I was having a sandwich, but honestly, we did fine without having those things in the house. Then I caved, bought a bag of chips, and it was downhill from there. Last grocery trip, I tried to be better, and came home with a bag of pretzels. Still not great, but at least they don't have the grease of a bag of Lays. My only exception to this is probably chocolate. I tried to keep it out of the house, but then my craving went crazy and I ended up buying 3 bags of chocolate chips and immediately making a batch of chocolate chip cookies. Note to self: keep small amounts of chocolate in house at all times.
So that's it for now. With my loose calorie counting, I figured out I was consuming about 1800 calories on an average day. To lose a pound a week, you need to cut 500 calories a day, so I've been trying (again, only loosely counting) to keep it around 1200 per day. Combined with the running, hopefully I will be able to reach my goal!
Anybody have any helpful weight loss strategies to share?
Showing posts with label food. Show all posts
Showing posts with label food. Show all posts
Saturday, April 30, 2011

Thursday, April 28, 2011
Spring cupcakes (Another baking FAIL)
The day after Easter, I decided to go out and indulge in all the discounted Easter goodies. I went out with the intention of getting a Cadbury creme egg (my guilty pleasure), but to my dismay, they had all sold out. WHYYYYYYYY.
I did bring home some jelly beans and some peeps, and I thought I would try my hand at some spring cupcakes. (They are listed at Food Network as Easter cupcakes, but we will ignore that, and pretend that we're not too cheap to buy full priced Easter treats.)
I used a white cake and lemon frosting recipe from i am baker, which sounded pretty spring-y to me. I decided to tint the frosting pastel green, and omit the green coconut, because I'll be honest, I am not super fond of shredded coconut on my sweets.
Baking FAIL # 1: I tried to read the recipe off the computer, and remember it while I was running around in the kitchen. This resulted in the omission of 1/4 cup of sugar. My white cake cupcakes were more like white muffins.
Baking FAIL # 2: I did not have any cake flour on hand, so I substituted all-purpose flour using the handy dandy Cook's Thesaurus. They said cakes would be "slightly less delicate and crumbly", but hole tamale, was that an understatement. These are the densest cupcakes I've ever eaten.
Baking FAIL # 3: To compensate for the slightly less sweet cupcakes, I added a little more powdered sugar to my frosting. OMGDIABETESINACAN. One bite of my mega sweet frosting may satisfy a sweet tooth for a decade.
Baking FAIL # 4: When I tried to recreate the uber-cute spring scene from the Food network's cupcake, I realized that either my cupcakes were too small, or these peeps were TOO DAMN BIG.
UGH. So I just frosted the rest, and left them blank.
MM ate one, and declared it edible, and if you eat it with a proper ratio of frosting to cupcake, I agree it's not too bad. However, my baking ego has been hit hard with this one. I had a whole strawberry shortcake planned out, but now I think I'll just used my berries to make smoothies.
Sigh. Any big baking fails out there to share?
I did bring home some jelly beans and some peeps, and I thought I would try my hand at some spring cupcakes. (They are listed at Food Network as Easter cupcakes, but we will ignore that, and pretend that we're not too cheap to buy full priced Easter treats.)
I used a white cake and lemon frosting recipe from i am baker, which sounded pretty spring-y to me. I decided to tint the frosting pastel green, and omit the green coconut, because I'll be honest, I am not super fond of shredded coconut on my sweets.
Baking FAIL # 1: I tried to read the recipe off the computer, and remember it while I was running around in the kitchen. This resulted in the omission of 1/4 cup of sugar. My white cake cupcakes were more like white muffins.
Baking FAIL # 2: I did not have any cake flour on hand, so I substituted all-purpose flour using the handy dandy Cook's Thesaurus. They said cakes would be "slightly less delicate and crumbly", but hole tamale, was that an understatement. These are the densest cupcakes I've ever eaten.
Baking FAIL # 3: To compensate for the slightly less sweet cupcakes, I added a little more powdered sugar to my frosting. OMGDIABETESINACAN. One bite of my mega sweet frosting may satisfy a sweet tooth for a decade.
Baking FAIL # 4: When I tried to recreate the uber-cute spring scene from the Food network's cupcake, I realized that either my cupcakes were too small, or these peeps were TOO DAMN BIG.
 |
| Look out! It's Peep-zilla!!! |
 |
| Poor cupcake. You have no outlet in which to express yourself. |
Sigh. Any big baking fails out there to share?
Thursday, March 24, 2011
My birthday!
Although MM was on call on my birthday (boohoo), I had the opportunity to go out with my girlfriends that night for a nice quiet dinner at Maggiano's. One of my medical school friends is on a gluten free diet (AKA "a wheat allergy"), which through a great bout of irony is more common in Italians, and Maggiano's has a great gluten free menu. I also thought I could have my long noodles, but in all my birthday excitement, I had gnocchi instead. Short potato pasta.
SUPERSTITION FAIL.
The next night, when MM was post-call, he took me out to the Capital Grille, our go-to fancy place. I love love LOVE the Capital Grille. Who cares if it's a chain? I love how on special occasions, they take your picture, and give you a take home card with it that says "Live well and always find cause for celebration". I am sappy like that.

Despite MM urging me to try something new, I couldn't help but get my usual. The filet oscar. OH. EM. GEE. It's delicious. Go to your nearest Capital Grille and have one now if you haven't already.
We finished with a heavenly chocolate cake. Also divine, but nothing touches the filet oscar. NOTHING.
My lovely mother also sent me a birthday package. Included was three (3!!!) bags of homemade chocolate chip cookies, a box of brownies, 2 pairs of shoes (did I ever mention that I take after my mother, and that we LOVE shoes?), and 2 tops. I heart my mom. If I grow up to be exactly like her, I'd be ecstatic.
Oh, and she also included a birthday card. "I forgot to run to the store." she had explained. Witness:
"It's semi-homemade!" (We also both love the food channel--Sandra Lee anyone?) My mom cracks me up.
All in all, a pretty awesome and delicious birthday. YAY ME!
SUPERSTITION FAIL.
The next night, when MM was post-call, he took me out to the Capital Grille, our go-to fancy place. I love love LOVE the Capital Grille. Who cares if it's a chain? I love how on special occasions, they take your picture, and give you a take home card with it that says "Live well and always find cause for celebration". I am sappy like that.

Despite MM urging me to try something new, I couldn't help but get my usual. The filet oscar. OH. EM. GEE. It's delicious. Go to your nearest Capital Grille and have one now if you haven't already.
 |
| It's divine. Source |
My lovely mother also sent me a birthday package. Included was three (3!!!) bags of homemade chocolate chip cookies, a box of brownies, 2 pairs of shoes (did I ever mention that I take after my mother, and that we LOVE shoes?), and 2 tops. I heart my mom. If I grow up to be exactly like her, I'd be ecstatic.
Oh, and she also included a birthday card. "I forgot to run to the store." she had explained. Witness:
 |
| Note the very carefully applied white-out |
All in all, a pretty awesome and delicious birthday. YAY ME!
Wednesday, March 23, 2011
Back on the [blogging] ball
I'm not going to lie--this was a very hard post to write. Not because it's picture heavy (sorry) or controversial (sorry) but because it's my FIRST POST IN OVER A MONTH.
*hangs head in shame*
Blogging is like exercising. Super easy once you have your routine down, and you are doing it regularly. But stop for a while, and that first run is TORTURE.
So this is my attempt to start. Again. We'll do this chronologically:
Utah
MM and I had so much fun snowboarding out in Salt Lake City (SLC)! We stayed with his wonderful aunt and uncle out in Sandy, UT, and were a short drive from Solitude, where we spent five awesome days snowboarding.
Luckily for my rear end, I got a lot better at snowboarding than when we went to Wisconsin, and I even went on some blue runs! (For those of you who aren't familiar, like myself a few months ago, in order of increasing difficulty: green, blue, black diamond, double black diamond etc)
Unfortunately for my rear end, my last day of snowboarding was strongly punctuated when I landed HARD on my bum on a flat trail under some flat light, and let me tell you: it HURT. As in, it brought tears to my eyes as soon as it happened --that kind of hurt.
Thankfully MM's aunt let me use a bag of frozen peas to ice it when I got home (don't worry, they were not consumed later), and though my rear end still hurts a little when I run now, I still think the trip was still TOTALLY fun and worth it. I mean, just look at the view!
 SOO much fun. And highly recommended.
Florida
After our snowboarding stint in Utah, we flew down to Florida for a few days to spend time with MM's parents. And as fun as our snowy adventures were, holy canoli was I glad to be in warm weather.
While we were there, we ate at Tarpon Bay at the Hyatt Regency in Bonita Springs and had some of the most delicious seafood while seated over the water.
We also celebrated MM's father's birthday while we were down there with a GIANT sushi boat.
The three of us took the whole thing down like champs. It was pretty epic.
While we were down there, MM's dad also showed me how to shuck oysters!! I took a picture of him shucking, but since I have not asked his permission to plaster his face all over the interwebs, I will refrain from posting it. It was a great experience though! I never knew shucking oysters was so easy. I got the hang of it after about six, and shucked the last six of our dozen like a pro. If my cholesterol weren't already high, I would totally eat oysters all the time...
And that concludes my February vacation! Up next: my birthday and match day!
*hangs head in shame*
Blogging is like exercising. Super easy once you have your routine down, and you are doing it regularly. But stop for a while, and that first run is TORTURE.
So this is my attempt to start. Again. We'll do this chronologically:
Utah
MM and I had so much fun snowboarding out in Salt Lake City (SLC)! We stayed with his wonderful aunt and uncle out in Sandy, UT, and were a short drive from Solitude, where we spent five awesome days snowboarding.
 |
| MM and I on the slopes! |
 |
| MM and I at the summit at Solitude. How badass am I?? (not really; I am hanging on for dear life.) |
Thankfully MM's aunt let me use a bag of frozen peas to ice it when I got home (don't worry, they were not consumed later), and though my rear end still hurts a little when I run now, I still think the trip was still TOTALLY fun and worth it. I mean, just look at the view!

Florida
After our snowboarding stint in Utah, we flew down to Florida for a few days to spend time with MM's parents. And as fun as our snowy adventures were, holy canoli was I glad to be in warm weather.
 |
| Basking in the sun. Pretty much what I did everyday. |
 |
| (Photo from google images) |
 |
| Not our boat, but you get the idea. Source |
While we were down there, MM's dad also showed me how to shuck oysters!! I took a picture of him shucking, but since I have not asked his permission to plaster his face all over the interwebs, I will refrain from posting it. It was a great experience though! I never knew shucking oysters was so easy. I got the hang of it after about six, and shucked the last six of our dozen like a pro. If my cholesterol weren't already high, I would totally eat oysters all the time...
And that concludes my February vacation! Up next: my birthday and match day!
Tuesday, February 15, 2011
Chinese New Year: Wontons
Okay, one last flashback from CNY: shrimp and pork wontons. I am not crazy about wonton soup, but after frying my turnip cake, I couldn't very well fry my wontons too, so soup it was.
I improvised this recipe for the most part, and overall it came out pretty tasty!
You will need:
3/4 lb Ground pork
Handful of uncooked shrimp, peeled and deveined
1 bunch of scallions
Sesame oil
Soy sauce
White pepper to taste
Chop up your shrimp into small pieces, and combine all ingredients in a bowl. I ended up using about a tablespoon of sesame oil, and 3 tablespoons of soy sauce. In retrospect, I would have used a little more soy sauce or added some additional salt because it was a little lacking in flavor.
Set up your wonton making station:

Your meat mixture, your wonton wrappers, and a bowl of water.
To make my wontons, I used the following method: Spoon a teaspoon or so of the meat mixture onto the center of a wonton wrapper. Using your index finger, wet two adjacent edges of the square wrapper with the water, like so:

The wrappers are lightly coated in corn starch, so wetting the edges will form a little "glue". Fold your wonton into a triangle, using the wet edges to seal in the meat securely. Make sure there is no trapped air in your wonton. Next, moisten one tip of the triangle, and press it against the other, forming a little "flower":

Isn't it cute?? Continue until you have used up your meat mixture. If you overstuff some of your wontons, like I did, they may become unsealed when you cook them.

Do NOT, I repeat do NOT stack your wontons like this. The moisture from the meat inside will cause them all to stick to one another, and it will be a big mess, and some of them will definitely come apart while cooking. Instead, place your fresh wontons a single layer on a lightly corn-starched/floured surface.
Bring a pot of water to a boil, then cook the wontons on simmer, uncovered and stirring occasionally. When they are done, they will float to the top. Add to soup, or fry, and you have yourself some wontons!
YUM!
I improvised this recipe for the most part, and overall it came out pretty tasty!
You will need:
3/4 lb Ground pork
Handful of uncooked shrimp, peeled and deveined
1 bunch of scallions
Sesame oil
Soy sauce
White pepper to taste
 |
| That is white pepper on my pork--it's not rotten, I promise |
Chop up your shrimp into small pieces, and combine all ingredients in a bowl. I ended up using about a tablespoon of sesame oil, and 3 tablespoons of soy sauce. In retrospect, I would have used a little more soy sauce or added some additional salt because it was a little lacking in flavor.
Set up your wonton making station:

Your meat mixture, your wonton wrappers, and a bowl of water.
To make my wontons, I used the following method: Spoon a teaspoon or so of the meat mixture onto the center of a wonton wrapper. Using your index finger, wet two adjacent edges of the square wrapper with the water, like so:

The wrappers are lightly coated in corn starch, so wetting the edges will form a little "glue". Fold your wonton into a triangle, using the wet edges to seal in the meat securely. Make sure there is no trapped air in your wonton. Next, moisten one tip of the triangle, and press it against the other, forming a little "flower":

Isn't it cute?? Continue until you have used up your meat mixture. If you overstuff some of your wontons, like I did, they may become unsealed when you cook them.

Do NOT, I repeat do NOT stack your wontons like this. The moisture from the meat inside will cause them all to stick to one another, and it will be a big mess, and some of them will definitely come apart while cooking. Instead, place your fresh wontons a single layer on a lightly corn-starched/floured surface.
Bring a pot of water to a boil, then cook the wontons on simmer, uncovered and stirring occasionally. When they are done, they will float to the top. Add to soup, or fry, and you have yourself some wontons!
YUM!
Monday, February 14, 2011
Chinese New Year: Turnip cake
Now that I have recovered from cooking that huge meal on Chinese New Year's Eve, I shall go back and share that long and painful process with you all.
Starting with the turnip cake. I very loosely adapted a recipe from Appetite for China, and set off to H mart to get my ingredients. Of course, being the wonderfully prepared person I am, I forgot the list. So I may have improvised a little.
You will need:
3 1/4 cups rice flour
2 lbs of turnip
Add ins of your choice (I used Chinese sausage, or lop cheong)
Soy sauce (regular or dark)
Salt
First of all, the recipe called for 2 cups of water to combine with the rice flour, then to mix until it became "velvety". I added 2 cups to my flour, and the best consistency I could get was "ricotta cheese". So I ended up adding a little more water (hey, Chinese cooking is an imperfect science, okay?), probably closer to 3 cups, until it became smooth like cake batter.
Kuan's recipe also calls for 1 large Chinese turnip, weighing about 2 pounds. I couldn't find that big of a freakin turnip, so I ended up with 5 of these things:

Together, they weighed about 1.8 lbs. Good enough. Peel them suckers and slice them into rectangles about 2 cm wide and deep (see picture below). Next for MM's favorite, the lop cheong:

We made the mistake last time of buying the sweet kind. Do not make that same mistake. Kuan's recipe also called for some mushrooms and dried shrimp, or har mai, which I don't care for, so I left it out. Instead, I had some scallions lying around, so I chopped those up along with the lop cheong.

Next you want to cook the add ins with a little bit of soy sauce for some flavor. Set those aside. In that same wok, add your turnip and stir fry for about 2-3 minutes, adding in more oil if needed.

Then pour in about 1 cup of water, and steam the turnip for about 10-15 minutes until just cooked. My turnip was still a little hard at 15 minutes, so I actually ended up steaming it for about 25 minutes. Whatever.
Next, the recipe calls for adding the hot turnip mixture into the rice flour mixture and "mixing thoroughly until the turnips are well incorporated". WTF? What does well incorporated mean? We will never know because her blog pictures the original raw ingredients, and then a perfectly finished turnip cake, so I had to guess. I'd seen my grandmother make taro cake (wu tao gow) before, and her finished "batter" was smooth without large pieces of taro in it, so I figured the turnip cake would be the same way.

That was about as "incorporated" as I could get it. Still has the consistency of thick ricotta cheese, and still with big chunks of turnip in it. I tried mashing the turnip into the flour mixture, but eventually got tired of that and left it as it. You couldn't really tell there were turnip chunks in the consistency of the final cake, so I imagine this degree of "incorporation" is fine. Anyway.
Mix in your add ins, in my case the lop cheong and scallions, and salt to taste (I added 1 tsp like the recipe called for, but it probably could have used a little more salt). Pour into a 10 inch cake pan, and smooth out the top.

Do NOT, as I did, use a round bottom pot. The middle will be a little undercooked when the edges are finished steaming. Bad Idea.
So steam the cake for about an hour (I steamed it for an hour and twenty minutes, which turned out better since the middle was still a little underdone), and allow the cake to cool before slicing.
The "optional" part, but not really optional, because turnip cake isn't good without it: the frying. After you slice the cake into small rectangles, fry the slices in batches about 3-5 minutes on each side in oil, and serve with (my favorite) hoisin sauce.
You can check out my cake in my CNY post, but Kuan has a better picture in her blog, so let's pretend my cake looked like that:
Then, enjoy!!! My homemade turnip cake turned out pretty decently, and as I mentioned was MM's favorite item on the menu. The texture was still a little off, due to the fact that the middle wasn't quite steamed through after more than an hour. That being said, I still enjoy it, but with all this effort, I think I will just stick to buying it in the future!
Starting with the turnip cake. I very loosely adapted a recipe from Appetite for China, and set off to H mart to get my ingredients. Of course, being the wonderfully prepared person I am, I forgot the list. So I may have improvised a little.
You will need:
3 1/4 cups rice flour
2 lbs of turnip
Add ins of your choice (I used Chinese sausage, or lop cheong)
Soy sauce (regular or dark)
Salt
First of all, the recipe called for 2 cups of water to combine with the rice flour, then to mix until it became "velvety". I added 2 cups to my flour, and the best consistency I could get was "ricotta cheese". So I ended up adding a little more water (hey, Chinese cooking is an imperfect science, okay?), probably closer to 3 cups, until it became smooth like cake batter.
Kuan's recipe also calls for 1 large Chinese turnip, weighing about 2 pounds. I couldn't find that big of a freakin turnip, so I ended up with 5 of these things:

Together, they weighed about 1.8 lbs. Good enough. Peel them suckers and slice them into rectangles about 2 cm wide and deep (see picture below). Next for MM's favorite, the lop cheong:

We made the mistake last time of buying the sweet kind. Do not make that same mistake. Kuan's recipe also called for some mushrooms and dried shrimp, or har mai, which I don't care for, so I left it out. Instead, I had some scallions lying around, so I chopped those up along with the lop cheong.

Next you want to cook the add ins with a little bit of soy sauce for some flavor. Set those aside. In that same wok, add your turnip and stir fry for about 2-3 minutes, adding in more oil if needed.

Then pour in about 1 cup of water, and steam the turnip for about 10-15 minutes until just cooked. My turnip was still a little hard at 15 minutes, so I actually ended up steaming it for about 25 minutes. Whatever.
Next, the recipe calls for adding the hot turnip mixture into the rice flour mixture and "mixing thoroughly until the turnips are well incorporated". WTF? What does well incorporated mean? We will never know because her blog pictures the original raw ingredients, and then a perfectly finished turnip cake, so I had to guess. I'd seen my grandmother make taro cake (wu tao gow) before, and her finished "batter" was smooth without large pieces of taro in it, so I figured the turnip cake would be the same way.

That was about as "incorporated" as I could get it. Still has the consistency of thick ricotta cheese, and still with big chunks of turnip in it. I tried mashing the turnip into the flour mixture, but eventually got tired of that and left it as it. You couldn't really tell there were turnip chunks in the consistency of the final cake, so I imagine this degree of "incorporation" is fine. Anyway.
Mix in your add ins, in my case the lop cheong and scallions, and salt to taste (I added 1 tsp like the recipe called for, but it probably could have used a little more salt). Pour into a 10 inch cake pan, and smooth out the top.

Do NOT, as I did, use a round bottom pot. The middle will be a little undercooked when the edges are finished steaming. Bad Idea.
So steam the cake for about an hour (I steamed it for an hour and twenty minutes, which turned out better since the middle was still a little underdone), and allow the cake to cool before slicing.
The "optional" part, but not really optional, because turnip cake isn't good without it: the frying. After you slice the cake into small rectangles, fry the slices in batches about 3-5 minutes on each side in oil, and serve with (my favorite) hoisin sauce.
You can check out my cake in my CNY post, but Kuan has a better picture in her blog, so let's pretend my cake looked like that:
 |
| Source |
Sunday, February 13, 2011
College style cooking
It's a little embarrassing that I am well past (well not that far past) my college years, but I am still cooking like a college student. By this, I don't mean I am cooking ramen every day or reheating TV dinners, but I just don't have a lot of specialty cookware and sometimes I need to improvise.
And by specialty cookware, I mean basic cookware. Or bakeware. Like a rolling pin. For your viewing pleasure, here is the "rolling pin" I used to make my egg tarts for Chinese New Year:

Yes, that is a liquor bottle (99 bananas to be exact) covered in plastic wrap. It wasn't perfect by far, but it got the job done.
Oh, and my "steamer" prior to Chinese New Year was this:

Allow me to explain this state-of-the-art steamer. That is a big pot with a little upside down bowl, on top of which I place a slightly bigger bowl, whose base fits on top of that little bowl. In that slightly bigger bowl, I place whatever I want to steam. Sounds foolproof, doesn't it? Except that the biggest bowl that will fit in this "steamer" is 5" in diameter, essentially only fitting in 1 serving of vegetables to steam.
Since I wanted to steam a fish and a turnip cake for Chinese New Year, I decided to cave and buy a real steamer. It was a beautiful, 3 tiered stainless steel beauty from my local H Mart. The one problem?

The dishes I wanted to steam were the right diameter, but just a tad too tall for the height of each tier. So I was forced, once again, to rig the steamer to fit a taller dish by turning the top tier upside down and putting the lid on the "bottom" of the top tier.
Apparently I am doomed to always turn things upside down when I steam.
Anybody else have any, er, "creative" cooking methods?
Friday, February 11, 2011
Oprah's Favorite Mac N Cheese
I love macaroni and cheese. Like whoa. It is one of my absolute favorite comfort foods. I usually use Pioneer Woman's recipe for macaroni casserole, but when I found a recipe for Beecher's Mac and Cheese whose claim to fame is being on this year's Oprah's Ultimate Favorite Things, I knew I just had to try it. Both PW and Beecher's involve making a roux, so this ain't your quick five minute mac and cheese, but I bet you anything it'll taste better than your fluorescent yellow Kraft meal.
Recipe Originally posted on Martha Stewart's website.
You will need:
Beecher's Flagship Cheese Sauce:
4 tablespoons (1/2 stick) unsalted butter
1/3 cup all-purpose flour
3 cups milk
3 1/2 cups cheddar cheese, preferably Flagship, grated
1/2 cup Jack cheese, preferably Just Jack, grated
1/2 teaspoon coarse salt
1/4 to 1/2 teaspoon chipotle chile powder (I used chili powder)
1/8 teaspoon garlic powder
For the Beecher's Mac and Cheese:
6 oz penne pasta
2 cups of Beecher's Flagship Cheese sauce
1/4 cup cheddar cheese, grated
1/4 cup Gruyere cheese, grated (I wasn't paying a $10 for Gruyere, so I just used Jack)
1/4 to 1/2 teaspoon chipotle chile powder

Melt butter in a heavy-bottomed saucepan over medium heat.

Whisk in flour. Continue whisking and cooking for 2 minutes.

Slowly add milk, whisking constantly. Cook, stirring frequently, until sauce has thickened, about 10 minutes.

Remove from heat. Add cheeses, salt, chile powder, and garlic powder.
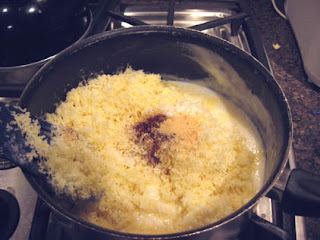
Stir until cheese has melted and all ingredients are well incorporated, about 3 minutes. Use immediately or refrigerate up to 3 days. To reheat sauce, place in a saucepan over low heat, stirring frequently, until heated through.
Preheat oven to 350 degrees. Butter or oil an 8-inch baking dish and set aside. Cook penne according to package directions for 2 minutes less than recommended on the package. Rinse pasta in cold water; set aside. In a medium bowl, mix together cooked pasta and sauce gently but thoroughly. Pour pasta into prepared baking dish; sprinkle with cheeses and chile powder.

Bake, uncovered, for 20 minutes. Let stand 5 minutes before serving.

Enjoy!! I thought this mac and cheese was okay--I enjoyed the different cheeses and the kick from the chili powder, but I'm torn between this one and Pioneer Woman's. Oh well, more mac and cheese for me to rotate between!
Recipe Originally posted on Martha Stewart's website.
You will need:
Beecher's Flagship Cheese Sauce:
4 tablespoons (1/2 stick) unsalted butter
1/3 cup all-purpose flour
3 cups milk
3 1/2 cups cheddar cheese, preferably Flagship, grated
1/2 cup Jack cheese, preferably Just Jack, grated
1/2 teaspoon coarse salt
1/4 to 1/2 teaspoon chipotle chile powder (I used chili powder)
1/8 teaspoon garlic powder
For the Beecher's Mac and Cheese:
6 oz penne pasta
2 cups of Beecher's Flagship Cheese sauce
1/4 cup cheddar cheese, grated
1/4 cup Gruyere cheese, grated (I wasn't paying a $10 for Gruyere, so I just used Jack)
1/4 to 1/2 teaspoon chipotle chile powder

Melt butter in a heavy-bottomed saucepan over medium heat.

Whisk in flour. Continue whisking and cooking for 2 minutes.

Slowly add milk, whisking constantly. Cook, stirring frequently, until sauce has thickened, about 10 minutes.

Remove from heat. Add cheeses, salt, chile powder, and garlic powder.

Stir until cheese has melted and all ingredients are well incorporated, about 3 minutes. Use immediately or refrigerate up to 3 days. To reheat sauce, place in a saucepan over low heat, stirring frequently, until heated through.
Preheat oven to 350 degrees. Butter or oil an 8-inch baking dish and set aside. Cook penne according to package directions for 2 minutes less than recommended on the package. Rinse pasta in cold water; set aside. In a medium bowl, mix together cooked pasta and sauce gently but thoroughly. Pour pasta into prepared baking dish; sprinkle with cheeses and chile powder.

Bake, uncovered, for 20 minutes. Let stand 5 minutes before serving.

Enjoy!! I thought this mac and cheese was okay--I enjoyed the different cheeses and the kick from the chili powder, but I'm torn between this one and Pioneer Woman's. Oh well, more mac and cheese for me to rotate between!
Wednesday, February 9, 2011
Strawberry scones (food FAIL)
I recently bought a big bag of frozen strawberries in attempt to curb my sweets cravings. Then I realized I crave refined sugar, so I decided to make something sweet with my strawberries using things I had laying around the house.
Enter strawberry scones.
I got the recipe from Tyler Florence, and I don't entirely recommend the recipe for reasons you'll see below. But I already took the freakin' pictures, so deal with it.
You will need:
2 cups all-purpose flour
3 Tbsps sugar, plus more for sprinkling scones
1 Tbsp baking powder
1 tsp baking soda
3/4 tsp kosher salt
3/4 stick cold unsalted butter, cubed
1 1/2 cups fresh mixed berries (I used my frozen strawberries)
3/4 cup buttermilk, plus more to brush scones
 There were several things I did differently in this recipe, and they may all explain why this recipe was a major FAIL for me. First, the linked recipe above has an accompanying Orange Honey Butter from which the buttermilk for the scones is derived. I didn't have heavy cream, so I made my own buttermilk (see below). Second, I did not have a food processor, so I used my hands.
First, preheat your oven to 400 F.
If you are sophisticated and have a food processor, add your flour, sugar, salt, baking soda and baking powder to the food processor. If you don't, dump it in a big bowl. Add the cubes of butter and pulse until you have the texture of coarse bread crumbs. Or, like me, work the butter in until you get finger cramps and a close approximation of bread crumbs.
Next, add buttermilk. If you did not make the Orange Honey Butter recipe, and you do not have buttermilk in the house, you can make your own by combining 1 cup of regular milk with 1 Tbsp of vinegar and allowing that to sit for 10 minutes. (Thanks, Cook's Thesaurus!)
Stir to combine, and as the dough comes together, add the berries.

This may actually have been my next mistake, as I think the berries were supposed to be folded in prior to it forming such a nice lump. Because of this, the next steps were really gross and messy as I tried to force the frozen strawberries (which at this point were getting soft) into the dough. Hence, no pictures. If I had a slightly weaker stomach, I don't think I would have been able to consume the final product having seen the gross wet pink dough that was that last step.
ANYWAY...drop spoonfuls of your gross dough onto a parchment lined sheet. Brush with buttermilk and sprinkle sugar on top. Or if your dough is already ridiculously wet with frozen strawberry juice an your tears, just sprinkle the damn sugar without the buttermilk.
Bake until puffy and golden brown, about 17 to 20 minutes.
The scones came out a little dense, and the dough around the berries seemed a little undercooked, while the rest of it was a little dry and overcooked. Again, it could have been due to all those changes I made, but I likely won't be retrying this recipe.
Anyone have a good scone recipe they can share?
Enter strawberry scones.
I got the recipe from Tyler Florence, and I don't entirely recommend the recipe for reasons you'll see below. But I already took the freakin' pictures, so deal with it.
You will need:
2 cups all-purpose flour
3 Tbsps sugar, plus more for sprinkling scones
1 Tbsp baking powder
1 tsp baking soda
3/4 tsp kosher salt
3/4 stick cold unsalted butter, cubed
1 1/2 cups fresh mixed berries (I used my frozen strawberries)
3/4 cup buttermilk, plus more to brush scones

First, preheat your oven to 400 F.
If you are sophisticated and have a food processor, add your flour, sugar, salt, baking soda and baking powder to the food processor. If you don't, dump it in a big bowl. Add the cubes of butter and pulse until you have the texture of coarse bread crumbs. Or, like me, work the butter in until you get finger cramps and a close approximation of bread crumbs.
 |
| Close enough. |
Stir to combine, and as the dough comes together, add the berries.

This may actually have been my next mistake, as I think the berries were supposed to be folded in prior to it forming such a nice lump. Because of this, the next steps were really gross and messy as I tried to force the frozen strawberries (which at this point were getting soft) into the dough. Hence, no pictures. If I had a slightly weaker stomach, I don't think I would have been able to consume the final product having seen the gross wet pink dough that was that last step.
ANYWAY...drop spoonfuls of your gross dough onto a parchment lined sheet. Brush with buttermilk and sprinkle sugar on top. Or if your dough is already ridiculously wet with frozen strawberry juice an your tears, just sprinkle the damn sugar without the buttermilk.
Bake until puffy and golden brown, about 17 to 20 minutes.
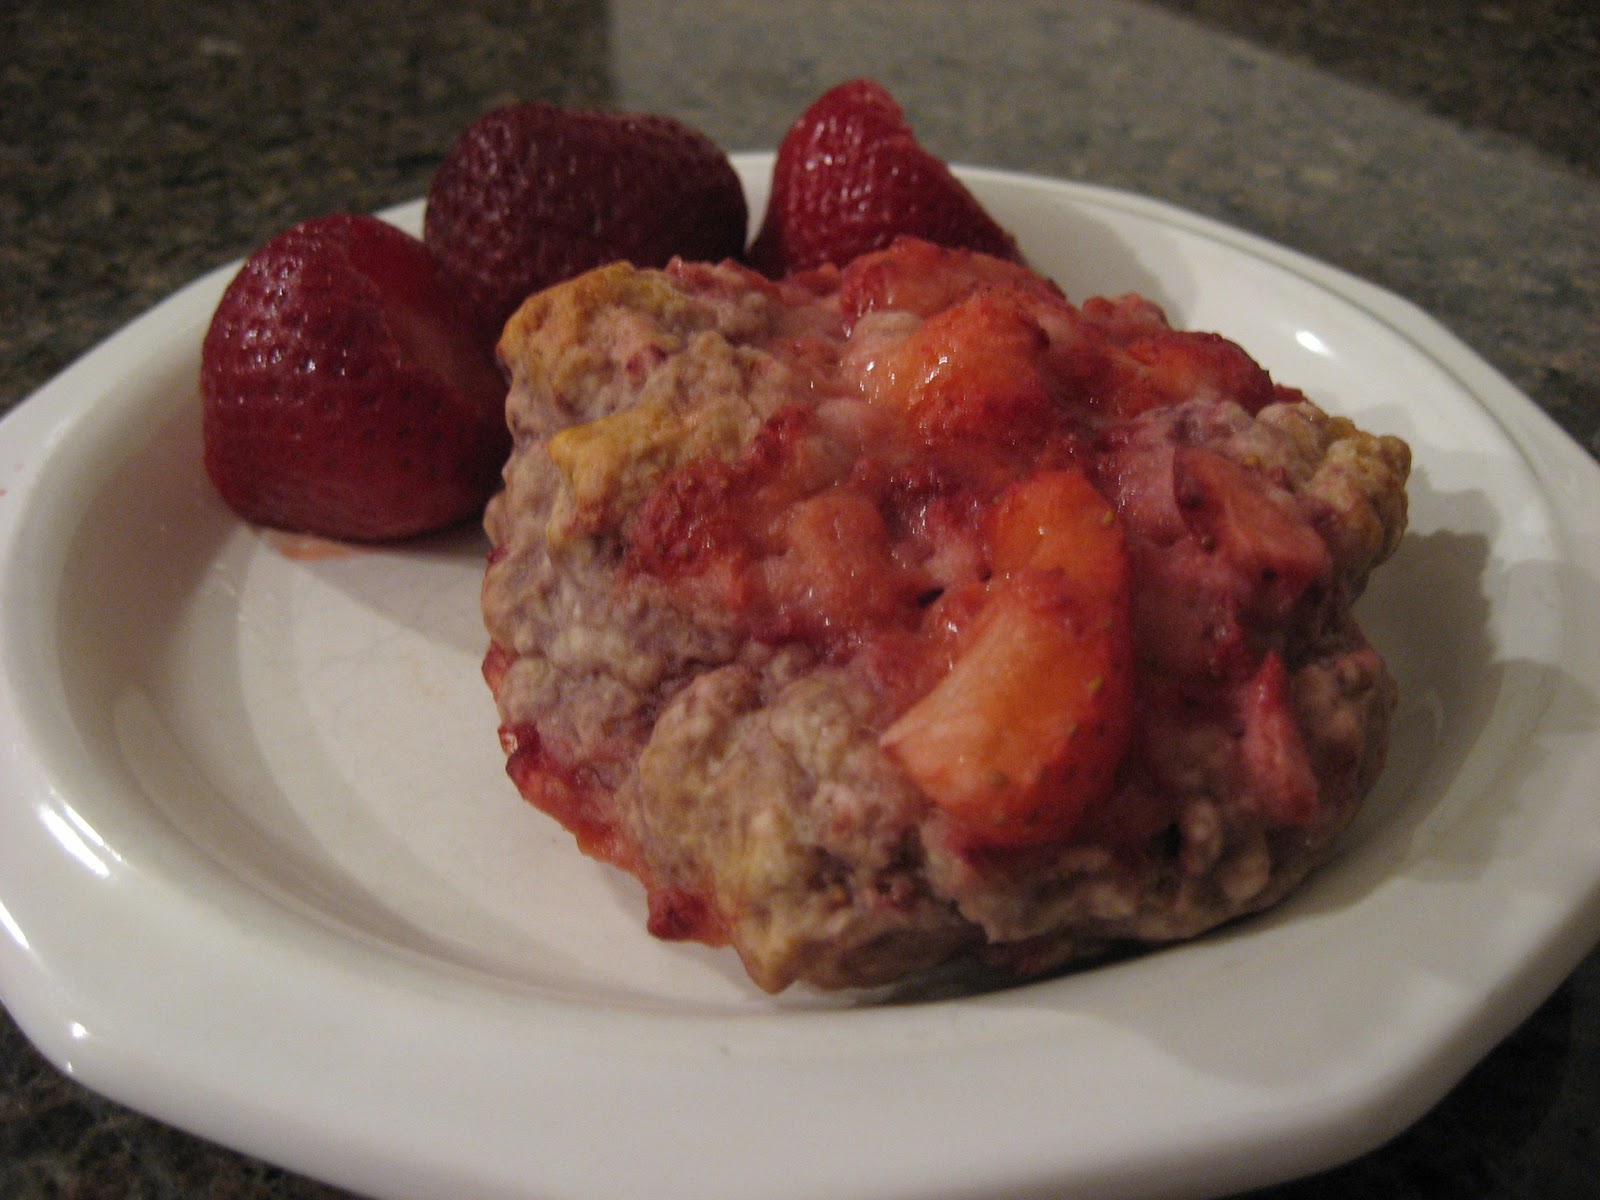 |
| Believe it or not, this was the best looking one. |
Anyone have a good scone recipe they can share?
Thursday, February 3, 2011
Happy Chinese New Year!

Hopefully everyone's feasts went well! Remember, no cleaning or showering or crying today ;)
 |
| I may have gone overboard for just MM and me. |
 |
| From my mom's kitchen to my own! |
What can I say? I have a huge sweet tooth.
It is the Year of the Rabbit, which is one of 12 animals in the Chinese zodiac. Now I had no idea until I linked that Wiki article, but apparently, in Vietnamese culture, it is the year of the Cat. This occurred because the Chinese word for rabbit sounds like the Vietnamese word for cat, and thus the rabbit, quite literally, got lost in translation!
 |
| My sister, who is a rabbit, would be so upset! (Source) |
MM has really been great about accepting this foreign holiday with all its bizarre traditions. As he graciously offered to clean the bathroom yesterday in honor of Chinese New Year, I let him use my Swiffer WetJet to help clean the floor. A few seconds later, I hear from the bathroom:
MM: This is AWESOME!! *buzz from the WetJet*
Haha, so he gets a red packet AND he discovered the joys of cleaning. I think it's been a good holiday!
Wednesday, February 2, 2011
Happy Chinese New Year's Eve!
'Tis the day to clean your homes, and prepare your feasts!
Because MM has just come off an overnight shift, we will be playing the night pretty low key. For dinner I will be trying my hand at a couple Chinese dishes, of course, most with symbolic meanings.
Among them:
Noodles (for longevity)
Fish (for wealth/abundance)
Dumplings (for wealth)
Turnip cake (because I love it)
Egg tarts (just because)
Luckily, I did most of the cleaning earlier this week, because this dinner sounds like it will take a while.
Hope everyone is enjoying a wonderful Chinese New Year's Eve! Tomorrow it will be the Year of the Rabbit (my sister's year)!
 |
| Source |
Sunday, January 30, 2011
Easy peasy curry
Don't you hate it when someone blogs a recipe, and you're like "Wow, that sounds really good!", but then you look through the ingredient list and there's one random thing that you can pretty much guarantee is not in your pantry?
Well I am going to do that to you today.
But if you love curry, and you don't have time to cook, this is a LIFESAVER. It's so easy, you could make this on a weekday, after coming home late, and with a hungry boyfriend waiting eagerly for dinner. Oh yes. All you need is whatever you have in the fridge/pantry, and this:
S&B Golden Curry sauce mix comes in four difference degrees of spice. MM and I like to live on the edge, so we bought Extra Hot.
It's so easy to use, I didn't even bother taking pictures. I ended up dicing up some skinless boneless chicken breast (but you can use any meat, or no meat at all!), some carrots, onion, potato, and throwing it all in a big pot of boiling water. After the potatoes and carrots had softened, and the chicken was cooked (this took about 10 minutes), I removed the pot from heat and threw in the sauce mix.

This particular sauce mix comes in a solid cube that is easily breakable into 4 pieces, with 2 cubes per package. The directions say to use 6 quarts of water for each cube, but I just estimated, and ended up boiling off a little more water because my curry was too thin. They also said to brown the meat before throwing it in. PAH! I bite my thumb at directions!

After stirring for 5 minutes or so, I was done! Just spoon your curry over rice and VOILA! A one pot meal. (As the household dishwasher, that is very much appreciated.) Unless you count the rice. But I don't.
YUM!
For two busy curry lovers, this is perfect! (Curry snobs...probably not.) Bonus: it makes a HUGE amount of curry. MM and I ate this for 3 meals, and I had an extra serving for lunch!
Well I am going to do that to you today.
But if you love curry, and you don't have time to cook, this is a LIFESAVER. It's so easy, you could make this on a weekday, after coming home late, and with a hungry boyfriend waiting eagerly for dinner. Oh yes. All you need is whatever you have in the fridge/pantry, and this:
 |
| S&B Golden Curry |
It's so easy to use, I didn't even bother taking pictures. I ended up dicing up some skinless boneless chicken breast (but you can use any meat, or no meat at all!), some carrots, onion, potato, and throwing it all in a big pot of boiling water. After the potatoes and carrots had softened, and the chicken was cooked (this took about 10 minutes), I removed the pot from heat and threw in the sauce mix.

This particular sauce mix comes in a solid cube that is easily breakable into 4 pieces, with 2 cubes per package. The directions say to use 6 quarts of water for each cube, but I just estimated, and ended up boiling off a little more water because my curry was too thin. They also said to brown the meat before throwing it in. PAH! I bite my thumb at directions!

After stirring for 5 minutes or so, I was done! Just spoon your curry over rice and VOILA! A one pot meal. (As the household dishwasher, that is very much appreciated.) Unless you count the rice. But I don't.
 |
| Not the best picture, but you get the idea. |
YUM!
For two busy curry lovers, this is perfect! (Curry snobs...probably not.) Bonus: it makes a HUGE amount of curry. MM and I ate this for 3 meals, and I had an extra serving for lunch!
Thursday, January 20, 2011
On a cold day
..there's nothing better than a hot grilled cheese on homemade bread with some tomato soup.

Stay warm!

Stay warm!
Tuesday, January 18, 2011
I make-uh zee bread
I am the grocery shopper in this household. If I left it up to MM, the only thing in this apartment would be beer and frozen pizza. So this week, when I forgot to buy bread, we naturally...ran out of bread. This may not sound like a problem, but in our house this is a OMG-DISASTER-PANIC-MODE-INEEDCARBS time.
So I decided to make bread.
"But DocFrock, why don't you just spend 20 minutes and buy a 99 cent loaf of bread at the store instead of spending 4 hours slaving away over experimental dough?" You ask.
Because I had the ingredients and I will save 99 cents today, so shut up. (More on my trial budget later.)
I decided to make a crusty french boule, courtesy of Vanilla and Lace. I had made this once before, but with the recipe originally intended for those with stand mixers, my first trial did not turn out as well as I had hoped. Hence, no pictures. So here we go (again): Take 2.
Please follow the above link for much better pictures and instructions. Stay here if you want the college-student-esque version in which I only own one mixing bowl and no stand mixer. Again, you have been warned.
You will need:
4 cups bread flour (3 3/4 for the bread, 1/4 for kneading)
2 tsp salt
2 tsp yeast
1 1/2 cups lukewarm water

Last time, I tried making a water well in my dry ingredients and dumping the dry yeast in, but as that batch was just short of a FAILURE, I decided to activate my yeast first in the lukewarm water.

While allowing the yeast to double in size in the warm water (this took about ten minutes), mix 3 3/4 cups of bread flour and 2 tsp of salt in a large mixing bowl, forming a well in the center. Once yeast has activated, pour yeast mixture into said well.
Mix ingredients together until you have a nice doughy mass. The original author did not have to use any additional flour or water, but I found that my dough was a little dry, so I ended up using an extra 6 tsp of water for my dough. All in all, this should have taken about 7 minutes.

Allow the dough to rest for 5 minutes.
Next, lightly flour a CLEAN countertop with the 1/4 cup of reserved bread flour, and knead dough for 3 minutes. You may not need to use all of the 1/4 cup (I ended up only using about 3 Tbsp). You should end up with a nice smooth satiny ball of dough.

Place your beautiful satin dough ball into a lightly oiled bowl (or in my case, a pot, since like I said I only have one mixing bowl). Turn the ball around in the bowl to coat the dough with oil, then cover with plastic wrap and a dish towel and allow the dough to rest for 1 1/2 hours.
Use this time to clean out your oven, because you were too lazy to wipe it down even after you put it on self-clean all day yesterday. Try not to make too much noise for fear of waking up your boyfriend who just got home from a 12 hour overnight shift. Fail miserably.
At this point, your dough should have doubled in size.

Take your monster dough and punch it down, reforming a ball. Return to bowl, cover, and allow to rest for another 30 minutes.After this second rest, place your dough on a lightly floured surface and cut into 2 pieces, tucking all your ugly ends underneath to form 2 smooth boules. Cover with a damp cloth, and allow to rest on the floured surface for another 45 minutes to an hour.

At some point during this rest, preheat your oven to 450 degrees Fahrenheit, with a baking rack on the bottom third of the oven, along with a baking stone (HA, I don't even have a stand mixer--a baking stone???) or an upside down baking sheet (or in my case, a pizza pan because I don't have a big enough baking sheet) in the oven to warm up. Because my bread looked rather anemic the first time around, I put the rack in the middle of the oven. I'm such a rebel.
Right before you put your 2 lovely boules in the oven to bake, make 2 slashes on top with a sharp knife to allow the bread to expand in the oven.
Remove your hot baking sheet from the oven, place your bread on top, and return to the baking rack.Next, to create steam. Take 1/4 cup of water, open the oven door, and pour water onto the bottom, and quickly close the oven door. Wait 2 minutes and repeat. (Note: I suck at creating steam. I have the reflexes of...something really slow.)
Bake for 20-25 minutes. If you insert a thermometer, it should read between 190 and 210 degrees F. Or you can just trust that 25 minutes will do it. Your bread should be a gorgeous golden shade, unlike my first albino batch.


Allow your bread to cool, then enjoy!!
(This batch turned out loads better than my first.)
Have you ever tried making bread before? If you have a favorite recipe, link it in the comments!
So I decided to make bread.
"But DocFrock, why don't you just spend 20 minutes and buy a 99 cent loaf of bread at the store instead of spending 4 hours slaving away over experimental dough?" You ask.
Because I had the ingredients and I will save 99 cents today, so shut up. (More on my trial budget later.)
I decided to make a crusty french boule, courtesy of Vanilla and Lace. I had made this once before, but with the recipe originally intended for those with stand mixers, my first trial did not turn out as well as I had hoped. Hence, no pictures. So here we go (again): Take 2.
Please follow the above link for much better pictures and instructions. Stay here if you want the college-student-esque version in which I only own one mixing bowl and no stand mixer. Again, you have been warned.
You will need:
4 cups bread flour (3 3/4 for the bread, 1/4 for kneading)
2 tsp salt
2 tsp yeast
1 1/2 cups lukewarm water

Last time, I tried making a water well in my dry ingredients and dumping the dry yeast in, but as that batch was just short of a FAILURE, I decided to activate my yeast first in the lukewarm water.

While allowing the yeast to double in size in the warm water (this took about ten minutes), mix 3 3/4 cups of bread flour and 2 tsp of salt in a large mixing bowl, forming a well in the center. Once yeast has activated, pour yeast mixture into said well.
 |
| My sad destroyed little well |

Allow the dough to rest for 5 minutes.
Next, lightly flour a CLEAN countertop with the 1/4 cup of reserved bread flour, and knead dough for 3 minutes. You may not need to use all of the 1/4 cup (I ended up only using about 3 Tbsp). You should end up with a nice smooth satiny ball of dough.

Place your beautiful satin dough ball into a lightly oiled bowl (or in my case, a pot, since like I said I only have one mixing bowl). Turn the ball around in the bowl to coat the dough with oil, then cover with plastic wrap and a dish towel and allow the dough to rest for 1 1/2 hours.
Use this time to clean out your oven, because you were too lazy to wipe it down even after you put it on self-clean all day yesterday. Try not to make too much noise for fear of waking up your boyfriend who just got home from a 12 hour overnight shift. Fail miserably.
At this point, your dough should have doubled in size.

Take your monster dough and punch it down, reforming a ball. Return to bowl, cover, and allow to rest for another 30 minutes.After this second rest, place your dough on a lightly floured surface and cut into 2 pieces, tucking all your ugly ends underneath to form 2 smooth boules. Cover with a damp cloth, and allow to rest on the floured surface for another 45 minutes to an hour.

At some point during this rest, preheat your oven to 450 degrees Fahrenheit, with a baking rack on the bottom third of the oven, along with a baking stone (HA, I don't even have a stand mixer--a baking stone???) or an upside down baking sheet (or in my case, a pizza pan because I don't have a big enough baking sheet) in the oven to warm up. Because my bread looked rather anemic the first time around, I put the rack in the middle of the oven. I'm such a rebel.
Right before you put your 2 lovely boules in the oven to bake, make 2 slashes on top with a sharp knife to allow the bread to expand in the oven.
 |
| Do NOT make your slashes this deep--my loaves look like that scene from Alien. I keep expecting a mutant head to pop out from the center |
Bake for 20-25 minutes. If you insert a thermometer, it should read between 190 and 210 degrees F. Or you can just trust that 25 minutes will do it. Your bread should be a gorgeous golden shade, unlike my first albino batch.


Allow your bread to cool, then enjoy!!
(This batch turned out loads better than my first.)
Have you ever tried making bread before? If you have a favorite recipe, link it in the comments!
Subscribe to:
Posts (Atom)